Deploying VMware VSAN 6.2 with vCenter Integrated – Part 4

Part 1 – Architecture, Prep & Cluster Deployment

Part 2 – vCenter Deployment and Configuration

Part 3 – Network Configuration

Part 4 – Troubleshooting: things that can go wrong (you are here)


I love technology and HCI is awesome but things that can still go wrong. Here are a few items that you hopefully won’t run into, but if you do here’s how to deal with them. I broke and rebuilt this environment a couple of times to see where some of the pitfalls are.


Disk Group Trouble

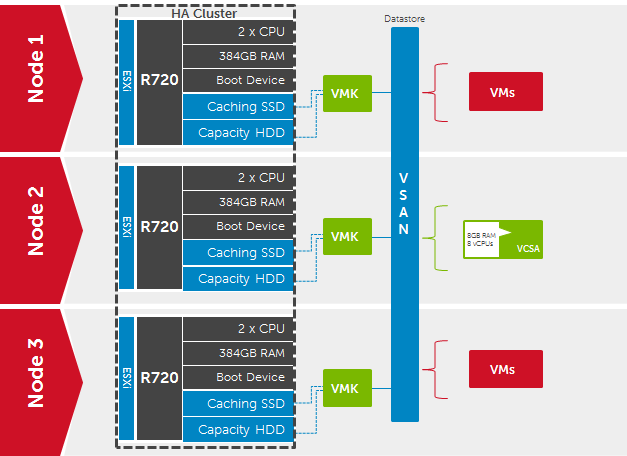
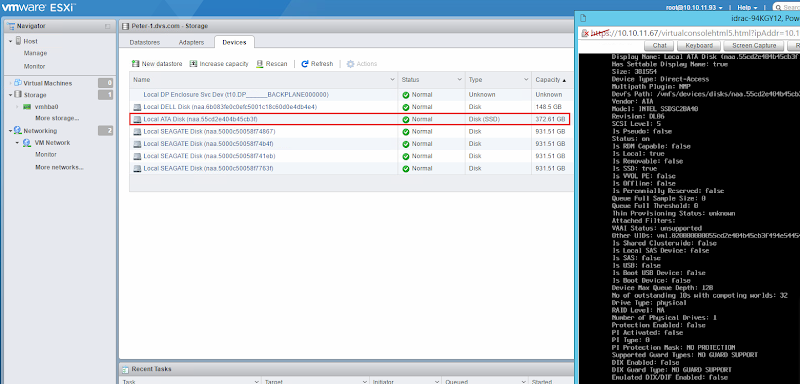
I had a small bit of disk weirdness with my original host reporting that one of my disk groups was unhealthy with 6 absent disks, immediately following the build of my HA cluster. Interestingly, the SSD in this DG was recognized and online but all the other disks were phantoms created somehow when I moved this host into the cluster. The two real HDDs were unassigned and waiting idly (disks in use 10 of 12). Notice the second disk group is healthy and really underscores the value of running at least two DGs per host which I highly recommend as a minimum. Don’t allow a disk or DG failure to generate a node failure event! The neat thing about VSAN is that you can add multiple disk groups which will increase capacity, increase performance and spread your failure domain wider.


This should hopefully be a rare occurrence but to resolve, I first vMotion’d my VCSA to another node. Enable vMotion on your existing vmk or create another, if you haven’t already. Then select an absent disk and remove it from the cluster. At this point I had no data to migrate so had no need for evacuation.


Once I removed the last absent disk, vSphere removed the disk group which now only had a single SSD. Start the Create Disk Group dialog and add the second DG with all appropriate disks now accounted for.


Now VSAN is happy with all DGs healthy on all hosts and I had zero service disruption to make this adjustment.


I rebuilt this environment to try and recreate this problem but did not see this issue the second time through.


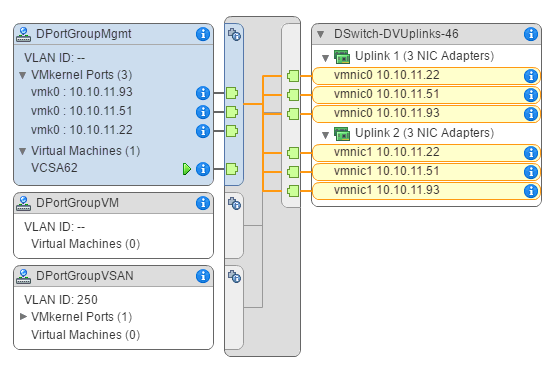
VCSA Stuck on VSS after vDS Migration

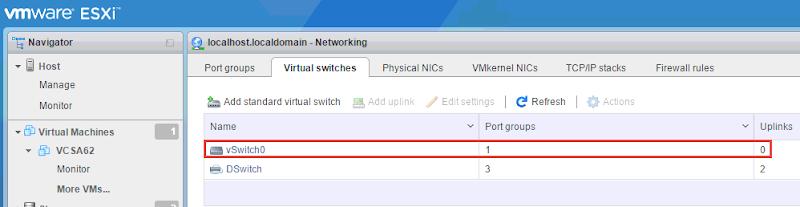
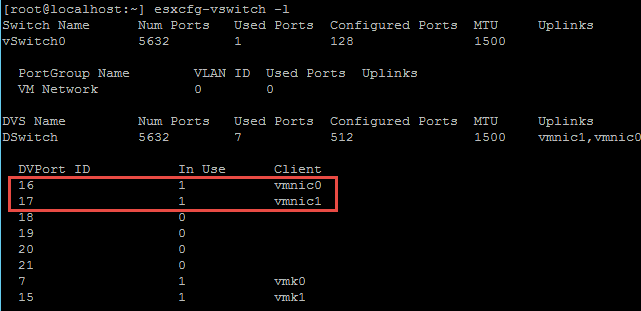
Attempting a migration of hosts + VCSA to vDS at the same time left VCSA stuck on VSS with no uplinks. I tried this one just to see if it would work, it didn’t. The VCSA migration method I laid out in part 2 of this series is the way to go. In this scenario the VCSA stayed on the local VSS because it had a vNIC attached to the local port group. Below you can see that the VSS no longer had any vmnics which of course took down vCenter.


To remedy this you need to first manually remove a vmnic from the new vDS on the VCSA’s host. First identify the port ID of the vmnic you would like to move.

esxcfg-vswitch -l


Remove that vmnic from the vDS.

esxcfg-vswitch -Q vmnic -V 17 dvSwitch


This vmnic should now be unassigned from the vDS and assignable to the local VSS. The vmnic can be claimed via the web host client or the desktop client.


Before the VSS would pass traffic I had to remove the vmnic and then add it back to the host (yep, 2 times). Now your VSS should have an uplink again which means vCenter should be accessible.


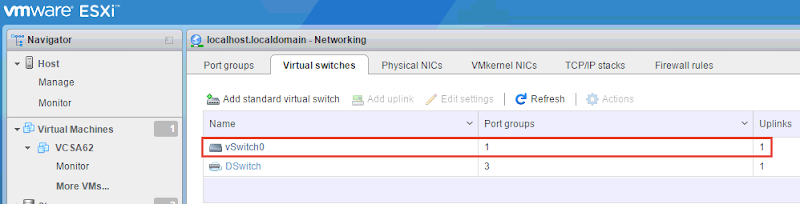
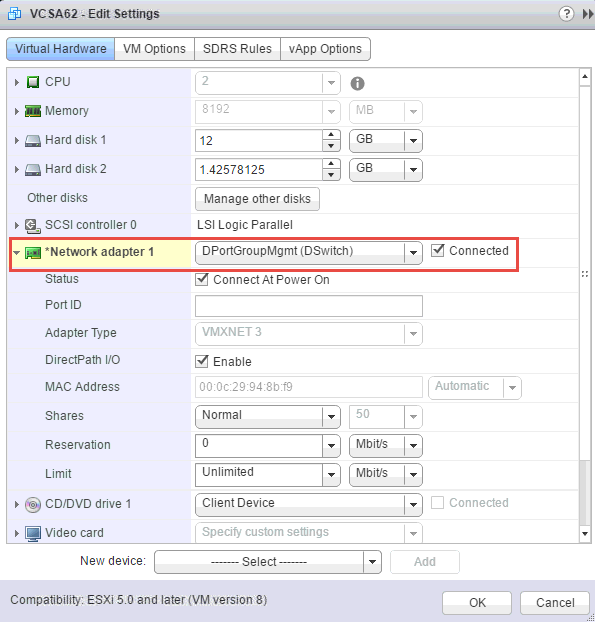
Change the vCenter vNIC to connect to a DPortGroup on the new vDS. Once this is complete you can safely migrate the host’s vmnic back over to the vDS again.


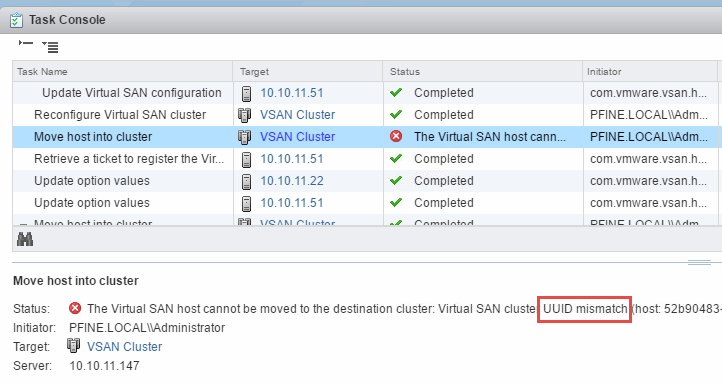
Storage Providers out of Sync

If you run into an issue where you are unable to move a host into the VSAN cluster, your storage providers may be out of sync. This is indicated by a UUID mismatch error and failed node move operation.

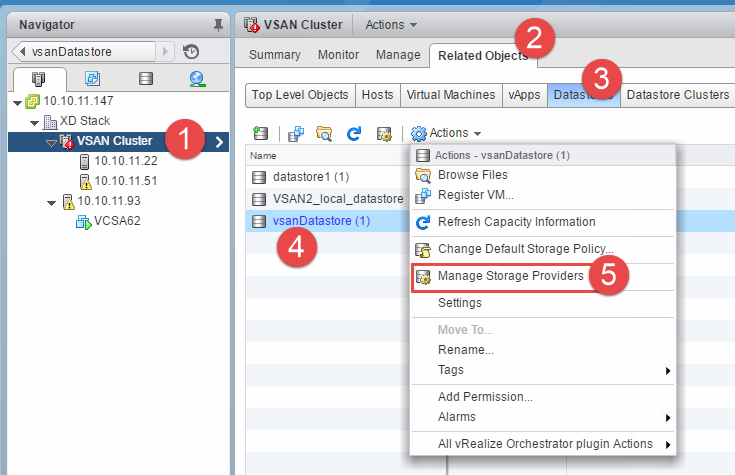
To resolve, from the HA cluster object click Related Objects, Datastores, then right click the vsanDatastore and select Manage Storage Providers.


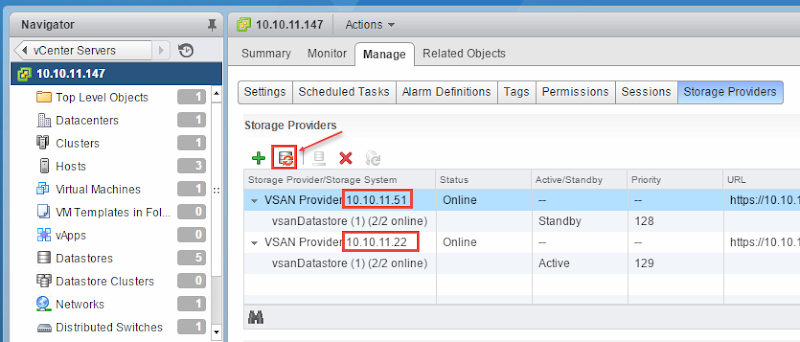
Select the icon with the red circular arrows to get all nodes in sync and retry your node add operation:


Restoring ESXi Hosts so you can Rebuild VSAN

Things went sideways for you for whatever reason and you need to go back to square 1. 

You can do this (a) the careful way or (b) the launch the nukes way

     (a) remove a vmnic from the host using the esxcfg-vswitch command, create a new VSS, add the vmnic, add the VMK to the VSS with a good IP. Repeat on each host.

     (b) just delete the vDS which will destroy all your networking, VMKs included and will shut down all VMs. Log into iDRAC, launch the console, F2 for settings, Network Restore Options, Restore Network Settings. This will rebuild your VSS and put your mgmt VMK there with the last known IP config. Overall this way will get you on the path quicker.


Delete the VCSA VM and vsanDatastore, start over.


Part 1 – Architecture, Prep & Cluster Deployment

Part 2 – vCenter Deployment and Configuration

Part 3 – Network Configuration

Part 4 – Troubleshooting: things that can go wrong (you are here)


Resources:

Bootstrap vCenter for VSAN 5.5 (Virtually Ghetto)

Enable SSD option on disks not detected as SSDs

ESXCLI VSAN commands

VCSA Resource Requirements

Change vSphere Web Client session timeout

VMware Compatibility Guide

vSwitch command line configuration

Deploying VMware VSAN 6.2 with vCenter Integrated – Part 3

Part 1 – Architecture, Prep & Cluster Deployment

Part 2 – vCenter Deployment and Configuration

Part 3 – Network Configuration (you are here)

Part 4 – Troubleshooting: things that can go wrong


Image result for vmware logo

Network Configuration

My new three node VSAN cluster is humming along just fine on the default VSS but to take this to the next level, I’m going to migrate the environment to a Virtual Distributed Switch (vDS). The desired end state architecture should look like the image below once complete.


First step create and name the new DSwitch.


Select the number of uplinks required. For my purposes I’ll be using two uplinks with all vmnics balanced between them to provide redundancy across both ports.


Build Distributed Port Groups (DPG) for each network or service grouping you require, including for the purpose of assigning specific IPs in different VLANs to VMKs.

image


Add hosts to the DSwitch and migrate the networking, this can be done one by one or as a group by using template mode. Be very careful automating any kind of VCSA migration at this stage!


Select which tasks you want to complete as part of this operation. Do NOT migrate the VCSA as part of this task, strongly recommend you do that via a separate step.


Assign physical NICs (vmnics) to the uplink port group DVUplinks. Make sure that your vmnics are balanced across the DVUplinks. Notice below that I’m migrating vmnic0 which is currently assigned to the local VSS.


Migrate the VMkernel adapters to the new DSwitch. Here I’ll be moving VMK0 on the local VSS to the new DPG DPortGroupMgmt.


Evaluate the impact and execute the operation. Once complete we can see that VMK0 has successfully migrated along with the host’s vmnics, to the new DSwitch topology.


Repeat this step on the remaining hosts that are not hosting the VCSA! For the host running the VCSA, migrate only one vmnic to the DSwitch, leaving the other vmnic active on the local VSS. This is very important, if you deprive the VCSA of network connectivity, bad things happen. Here I’ll be assigning only the vmnic currently unused by the host, vmnic0 attached to vSwitch0 must remain intact right now.


As an additional precaution, don’t migrate VMK0 of this host yet, we need to first configure the VCSA with a vNIC attached to the DSwitch. As long as the IP and VLAN will be the same you can make this change hot with no disruption.


Now it’s safe to migrate vmk0 and the remaining vmnic attached to the VSS vSwitch0 to the new DSwitch.


Here is the updated topology view with all host vmnics, VMKs and the VCSA migrated to the new DSwitch.

Next create additional VMKs on DPortGroups to isolate services like vMotion and VSAN if desired which can be done at the host level or via the DSwitch host manage dialogs.


 If you will be turning up new VMKs for VSAN, make sure to have the new VMKs on all hosts configured and communicating before disabling this service on the old VMKs!


Part 1 – Architecture, Prep & Cluster Deployment

Part 2 – vCenter Deployment and Configuration

Part 3 – Network Configuration (you are here)

Part 4 – Troubleshooting: things that can go wrong


Resources:

Bootstrap vCenter for VSAN 5.5 (Virtually Ghetto)

Enable SSD option on disks not detected as SSDs

ESXCLI VSAN commands

VCSA Resource Requirements

Change vSphere Web Client session timeout

VMware Compatibility Guide

vSwitch command line configuration

Deploying VMware VSAN 6.2 with vCenter Integrated – Part 2

Part 1 – Architecture, Prep & Cluster Deployment

Part 2 – vCenter Deployment and Configuration (you are here)

Part 3 – Network Configuration

Part 4 – Troubleshooting: things that can go wrong


Deploy vCenter

In case you hadn’t seen it yet, deploying vCenter has changed a bit in 6.x. The Windows/ SQL version of vCenter is still available but under most circumstances it is cheaper and much easier to deploy the vCenter Server Appliance (VCSA). To get started, mount the ISO, install the client integration plugin then launch vcsa-setup.html.


Follow the prompts and deploy your VCSA on the first VSAN host just created. For this deployment I’m using the embedded Platform Services Controller and creating a new SSO domain. Size your VCSA based on the number of anticipated hosts and VMs to be supported in this cluster. As before, you can opt to use the internal PostgreSQL database or connect to Oracle externally. If you need to use SQL for the database, you will need to deploy the Windows version of vCenter. 


Enabled Thin Disk Mode on the VSAN datastore if you’re concerted about VCSA space consumption and select the VSAN datastore as the location for the VCSA deployment.


Select a VM network available on the ESXi host which will be a VMware Standard Switch (VSS) at this point, assign a static IP to the VCSA and complete the deployment. The installer will download and deploy the appliance.

WARNING – Make sure to manually create a DNS A record for your VCSA or you will get a first boot error when the appliance is unable to resolve its hostname. If this happens you will need to fix the DNS issue then redeploy the VCSA!! You can also avoid this by using the static IP in the system name field instead of a FQDN.


Once the deployment is complete, login to vCenter using the web client with the SSO account you setup previously: administrator@pfine.local. Create a new Datacenter grouping, add your ESXi hosts to vCenter, add your license keys then assign them to your vCenter and ESXi instances.


Active Directory Integration

If desired, join your VCSA to your AD domain for single sign-on. In the web client from Home, navigate to Administration –> System Configuration. Select the Nodes link, click your VCSA instance, click the Manage tab, click Active Directory under settings then click the Join button and enter the relevant details. Reboot the VCSA to enact the changes.


Login again to the Web Client and navigate to the Configuration page, choose the Identity Sources tab and add AD with your domain as the source type.


Finally add AD users or groups and assign them to vCenter roles. You can now log into vCenter with your domain credentials.


Build the HA Cluster

Before we build a new HA Cluster object, we first need to enable VSAN on the default management VMK0 which lives on the default VSS. Repeat this on each host that will join the cluster.


Right-click the datacenter object and invoke the New Cluster dialog. Give it a name, enable DRS, HA and VSAN. Make sure to leave the VSAN disk mode to automatic here. If you have a single caching SSD VSAN will build one disk group (DG), if you have two caching SSDs VSAN will build two DGs and spread the available capacity disks evenly amongst them. Select your desired automation and admission control levels.


Very important: Add the host running the VCSA to the new cluster first so it becomes the master host contributing its existing VSAN datastore! If you add one of the other hosts first, then a net new VSAN datastore would be created and make it difficult to add the pre-existing VSAN datastore later.  Add each remaining host to the new HA cluster by dragging them in.


Assign a VSAN license to your cluster and double-check that all disks in the cluster are running the same On-disk format version. Found on the HA Cluster object/ Manage/ Virtual SAN/ General, update any that are outdated.


As an optional but recommended step, turn on the VSAN performance service from the Health and Performance page of the same tab. This will give you more historical performance information for the cluster.


Make sure to also update the VSAN HCL database and test your deployment for issues. This can be found on the Monitor tab under Virtual SAN on the Health page. You’ll notice below that I have a few yellow warnings relating to my H310 storage controller. In this particular instance, I’m using a newer driver than what is actually certified for the HCL (06.805.56.00 vs 06.803.73.00). Very VERY important that whatever you deploy is fully certified via the VMware Compatibility Guide.


Now the VSAN cluster should be happy and humming along with all nodes contributed storage. Here you can see the dual disk group hybrid configuration of two of my hosts. Note that one of my caching devices failed on .93 so I had to replace it with a smaller 200GB SSD. Just an interesting thing to note here since I have two DGs on one host with slightly differing configurations. VSAN is happy despite.


On the VSAN monitoring tab we can see how the physical disks have been allocated and clicking around reveals which VM objects are stored on which disks including current consumption.


Here is a look at the capacity reporting of the cluster currently only hosting my VCSA with thick disks. Notice that dedupe and compression are unavailable as this is a hybrid configuration.

image[64]


In the next part I’ll walk through converting this environment from a Virtual Standard Switch to a Distributed vSwitch.


Part 1 – Architecture, Prep & Cluster Deployment

Part 2 – vCenter Deployment and Configuration (you are here)

Part 3 – Network Configuration

Part 4 – Troubleshooting: things that can go wrong


Resources:

Bootstrap vCenter for VSAN 5.5 (Virtually Ghetto)

Enable SSD option on disks not detected as SSDs

ESXCLI VSAN commands

VCSA Resource Requirements

Change vSphere Web Client session timeout

VMware Compatibility Guide

vSwitch command line configuration

Deploying VMware VSAN 6.2 with vCenter Integrated – Part 1

Part 1 – Architecture, Prep & Cluster Deployment (you are here)

Part 2 – vCenter Deployment and Configuration

Part 3 – Network Configuration

Part 4 – Troubleshooting: things that can go wrong


Image result for vmware logo

Deploying VMware Virtual SAN (VSAN) into a greenfield environment can be done a couple of ways. The easiest of which would be to deploy a vCenter Server first on separate infrastructure, deploy the ESXi hosts and then build the cluster. But what if you want to deploy vCenter such that is resides on the shared datastore you intend to create with VSAN and live within the supporting hosts? This is called bootstrapping vCenter within VSAN and was previously covered by William Lam for a single node deployment on vSphere 5.5. The concept is similar here but I’ll be deploying a full 3-node cluster, using vSphere 6.2 and configuring a two disk group hybrid config. VSAN being a kernel-level service within ESXi can be configured without vCenter on a single node. vCenter of course is required for multi-node clustering, licensing and management of the HA cluster, but the value here is that we can deploy VSAN first, then add vCenter to the newly created VSAN datastore without having to move things around after the fact.


Architecture

The basic tenets of the VSAN architecture are relatively simple: an ESXi kernel-level service enabled via VMK port, managed by vCenter, running on each node in a cluster whom contribute local disks to form a distributed datastore, accessible entirely via the network that connects them. VSAN uses the concept of Disk Groups (DG) to organize storage which are a collection of cache and capacity devices that can be all flash or a mix of flash and spinning disk (hybrid). One cache device is allowed per DG and I strongly recommend using at least 2 x DGs for resiliency as well as increased performance in all configurations. Caching behavior differs depending on the model deployed, hybrid uses 30% of the cache device for writes while all flash dedicates 100% of the cache device to writes. The basic rule of VSAN sizing is that cache should be sized based on 10% of anticipated consumed capacity (in VMDKs) before failures tolerated are considered. In other words, make sure your cache SSD is big enough to handle the capacity disks you put behind it, by at least 10%, per disk group. 10Gb networking is recommended and required for all flash configurations.

Policy plays an important role in VSAN which provides a great deal of configurability but also dictates the most important single policy element: Failures To Tolerate (FTT). FTT defaults to a value of 1 which means that every VM will have one replica of its data across the cluster. The maximum value is 3 but each replica created has an impact on available usable disk capacity, plan accordingly.

For more in-depth info and some light bedtime reading, check out the very good Virtual SAN 6.2 Design Guide


My Environment:

  • 3 x PowerEdge R720xd
    • 2 x E5-2650v2 CPUs
    • 384GB RAM
    • 2 x 160GB SSDs (Boot)
    • 2 x 400GB SSDs (Caching)
    • 4 x 1TB HDDs (Capacity)
    • 2 x 10Gb NICs
    • vSphere 6 Update 2
      • ESXi 6.0.0, 3620759
      • vCenter Server 6.0 Update 2 Appliance


Here is the architecture of the cluster I will deploy via this exercise. Even though I’m using 12G PowerEdge servers here, these steps should be very similar on 13G platforms.


Prep

Very important, make sure all applicable hardware components are on the VMware VSAN Certified List! First make sure that all the disks to be used in the VSAN cluster are in non-RAID pass-through mode, assuming your storage controller supports this. If using a supported Dell PERC controller, this should be the default. Conversion of each disk may be necessary if rebuilding from a previous configuration which is performed on the PD Mgmt tab.


If you don’t see the option to “convert to non-RAID”, first select the “Factory Default” option on the Ctrl Mgmt tab. You should then be able to convert all disks to non-RAID if required or they will default to this. Repeat this process on all hosts.

Install ESXi 6 on each node and enable the ESXi Shell or SSH, whichever you prefer, via the Troubleshooting Options menu of the Direct Console. Enter Alt+F1 at the home screen of the Direct Console UI to log into the ESXi Shell, to exit the ESXi Shell, press Alt+F2.


Verify that the disks intended to be used for VSAN are visible to the host and take note of the device names (naa.xx) as you will need these in a moment to build the DG. Below you can see the devices from the host client as well as within ESXi Shell running the command:

esxcli storage core device list

If using pass-through disks, the disks should be properly identified as SSD or HDD with a slew of additional information available. If using RAID0 disks, much less information will be visible here.


By default the VSAN policy should be set at a host Failure To Tolerate (FTT) of 1 for all classes with force provisioning set on vswap and vmem. This policy is present on a fresh ESXi host with no vCenter management. Force provisioning allows VSAN to violate the FTT policy which we need when building out this initial cluster on a single node, so we need to add this policy value to vdisk and vmnamespace policy classes.


Verify the VSAN policy defaults:

esxcli vsan policy getdefault

Enable force provisioning for vdisk and vmnamespace. Take note of the case sensitivity here, these commands will fail silently if case is incorrect.

esxcli vsan policy setdefault -c vdisk -p "((\"hostFailuresToTolerate\" i1) (\"forceProvisioning\" i1))"

esxcli vsan policy setdefault -c vmnamespace -p "((\"hostFailuresToTolerate\" i1) (\"forceProvisioning\" i1))"

Recheck the policy to ensure proper adhesion.


Create the VSAN Cluster

VSAN being a kernel-level service can be created without vCenter even being present. Within the ESXi Shell of your first host, run the following command to create the VSAN cluster:

esxcli vsan cluster new

Verify the details of the new cluster. Note that this host is now the Master node for the VSAN cluster:

esxci vsan cluster get

Once the cluster is created, add each disk to the cluster, note that any capacity disks you add here will go into the same disk group, 1 x SSD per DG. If you intend to create multiple disk groups, only add the disks you want present in the first disk group at this stage. -s signifies SSD and -d signifies HDD. Use multiple -s or -d statements within the command to add multiple disks. For my first disk group I’ll be adding 1 x SSD (372GB) and 2 x HDDs (931GB)

esxcli vsan storage add -s naa.xx -d naa.xy -d naa.xz 

Once complete, run the following to verify that the disks were added properly and assigned to the correct tier. All disks are designated as capacity or not, cache tier SSDs should report false:

esxcli vsan storage list

If you connect to this host using the vSphere desktop client you will see the new datastore listed under storage, it will not be visible in the web host client. Notice that the reported VSAN datastore capacity is based on the capacity tier disks only and represents a raw value (2 x 931GB = 1.8TB).


So at this point we have a fully functional baby VSAN deployment running on one node with a three disk hybrid configuration. In the next part we’ll look at deploying and configuring vCenter to take this to the next level.


Part 1 – Architecture, Prep & Cluster Deployment (you are here)

Part 2 – vCenter Deployment and Configuration

Part 3 – Network Configuration

Part 4 – Troubleshooting: things that can go wrong


Resources:

Bootstrap vCenter for VSAN 5.5 (Virtually Ghetto)

Enable SSD option on disks not detected as SSDs

ESXCLI VSAN commands

VCSA Resource Requirements

Change vSphere Web Client session timeout

VMware Compatibility Guide

vSwitch command line configuration